Spring Clean

With the first days of spring under our belt, I think it’s time to clear our skies a bit. I’m not worried too much about crashing into the massive amount of debris and I feel I should leave that there as a punishment for not being too bothered about debris in the early stages of exploration.

The thing that is getting annoying is that all our old landers and satellites, that are of no more use, are floating around or sitting on the Mun or in other ridiculous places. All of these are then presented in the list of craft when I’m looking for things in the Tracking Station.

We’ve also got a couple of contracts to complete and some spacecraft to maintain. I refer specifically to making sure Atlas I and Tesla III are okay and doing what they are supposed to do.

Decommissioning:

To start with it’s time to get rid of the two empty fuel shots that are whizzing around above the Mun’s surface, they have plenty of mono-propellant left so a short retrograde burn sends them into the surface. They are going about 800m/s on impact and the debris has quite the bounce after impact!

Next up it’s the Vanguard I and I-A probes. I just abort these from the tracking centre – obviously someone fitted some explosives inside for just this reason! After that I get rid of Vanguard II and the entire Occulus satellite range, they have served us well but now they have reached the end of their operational tours. Then the final things are to de-orbit the remaining Odin II boosters and tidy up any debris that has landed on Kerbin.

Just to complete that satellite contract we missed last time I build a new Occulus I and launch it into the desired orbit, it’s neither hard, nor time consuming, but it does net another 160k funds and 24 science.

Back to Tesla III:

Now that Tesla III has left the Kerbin SOI it’s time to collect the RPWS and Magentometer science to complete the contract sections for science high around the sun. This gets a total of 158 science and 88k funds, but I’m really not convinced that Tesla III is going to be able to complete its desired mission. I really don’t think it has enough fuel, but maybe it can be retasked to do a flyby of Jool. Either way, it’s going to take me time to decide and I can’t really do anything else right now so it’s back to mission control.

Tesla III

The One I’ve Been Waiting For:

There’s 1.85M funds in the bank now and I decide to bite the bullet and upgrade the R&D Building. This opens up the next tier of technologies and I immediately spend 550 science on Advanced Science Tech which unlocks some of the best experiments as well as the ScanSat high resolution imager. This opens the door to a space probe that can accurately map planets and scan for biomes and resources.

Then I decide to go fishing for contracts and hit upon a test contract that will return 800k funds! All I have to do is launch a Kerbodyne KR-2L Advanced Engine into a sub orbital trajectory and then re-fire the engines after messing with the staging.

I’ve devised a highly technological “cone” for this mission. It’s just fuel, the engine under test, parachutes and solar panels connected to a probe core and SAS. It doesn’t have far to go, but those engines are not cheap so I’d like it back!

Flying Wedge

Launch is simple and after shutting the engine down and changing the staging it’s easy to reactivate the engine by staging at the appropriate altitude and then wait for the descent back to Kerbin. The parachutes weren’t quite enough to slow down the ship to land on its engine, so the engine exploded anyway. Typical.

Debriefing:

A much tidier mission control was the main aim of these missions and we came away with the added bonus of having 1.1M funds in the account as well as the upgraded R&D building. I’ve also decided to spend another 550 science from the last few missions on Meta-Materials. This gives access to the 2.5m diameter docking ports so we can finally start building that space station we always wanted.

Fundraising

We’ve now reached a bit of a block in our exploration of the solar system. We’ve collected so much science that we’ve managed to unlock every node available in the tech tree up to this point and since we can’t unlock anything costing more than 500 science that’s where we are now stuck.

To get unstuck we need to improve the R&D facility, but this costs 1,590,000 funds. We currently have 1,279,000 funds so that’s not going to fly. We need to make some money and fast and as everyone knows the best way to accumulate is to speculate (that’s not actually true, but it works in this situation), so the first thing to do is upgrade Mission Control to allow an infinite number of concurrent contracts. It’s also only 100k funds to upgrade.

Stocking Up:

Going through the currently active contracts there are a couple that we can finish off nice fast. One is testing landing gear at the KSC. This is a landing gear bay, stuck to a probe core – ’nuff said. That brings in about 400 funds and 50 science. Hardly a huge haul, but it frees up another contract to be collected. Then there is the mission to take visual surveys at the Mun and I’ve been putting this off for a while and after much deliberation I decide to cancel it all together.This costs us 45k funds and a little reputation, but there are better missions to be had now.

Three active contracts are dealing with the mission to collect magnetic data from around the Mun (it’s still going), and for our expedition to Duna and it’s moon, Ike. We don’t want to touch those. Finally I decided to pull the Unpaid Research Program for the time being as I’m not less concerned about science increases and more bothered about getting the reputation up for the better contracts which give more funds.

So after some massaging of the available contracts (by repeatedly declining things) I’ve got a nice set of contracts which should make for three missions

1). Data from Kerbin space, data from Mun space and plant a flag on the Mun’s surface – 160k total funds

2). Place a satellite in Keosynchronous orbit of Kerbin and in an equatorial orbit of Kerbin – 305k total funds

3). Magnetic Survey of the Sun – 850k total funds

We got a bit in the way of advances so it’s time to make some rockets!

Back to the Mun:

I’m returning to the Mun with another Odin II lander, but this time I’ve increased the amount of fuel in the primary launch booster. This should hopefully give enough fuel for us to perform a fairly inefficient landing and still make it back to Kerbin.

Launch is simple, up to 500km, then take some science from the RPWS and then set a transfer to the Mun. Once the transfer burn is completed I go back to the primary rocket stage and de-orbit it for recovery. Arrival at the Mun is pretty straightforward and I decide to land near to one of the anomalies that has been detected near the equator of the Mun.

Landing within 1000m of the anomaly, the crew, Burney, Erzer and Maloly, perform all the onboard science in the Northwest Crater. Then it’s the turn of Maloly to go outside, plant a flag and then head over to the anomaly and check it out.

On arrival it’s a massive monument with the Apollo Moon Lander on the top. A fitting tribute to Neil Armstrong (1930-2012), the first human to set foot on a body other than our own.

Monument

Then it’s back to the capsule and off into space. At this point I realise that the extra fuel has counted for nothing, it was all in the orbital stage which I dump before landing. This highlights a serious design problem with the Odin I & II in that they simply do not have enough fuel to land on the Mun and return under their own power.

Time to send another fuel shot up to save the B-Team. Since we’ve done a fuel shot to save the last Odin II, we know what we are doing.

Tesla II:

The new Tesla II should be able to pretty much go forever. It consists of huge solar arrays, an ion engine and a micro goo containment unit as well as an accelerometer. The science experiments can be changed easily so this should be a pretty versatile satellite.

front_Tesla II_1

Getting to a 200km orbit is no problem, but then things start to go decidedly wrong. Firstly I changed into the target orbit when fully in front of Kerbin, this meant that pushing out the other side of the orbit had to be done with Kerbin in the way of the sun. Powering a solar satellite with no Sun is hard work and it took 4 orbits to finally get to the desired position. Now for problem number 2 – MINI goo canisters seem to not be recognised as goo canisters for the purposes of the contract, so having spent all my time getting to the orbit, I can’t complete the first contract.

Learning is a useful human skill. To move to the second orbit, I set the initial transfer burn at the side of Kerbin. This time Tesla II is in full view of the Sun for both burns and orbit is easily achieved. Since the accelerometer counts as an accelerometer the contract is easily completed and another 95k is in the bank.

Tesla III:

Now time for the main event, something to net nearly a million in funds with one satellite.

front_Tesla III_1

Launch to 100km parking orbit is simple as always. Now we have to get Tesla III into solar orbit but that’s only just outside the Kerbin SOI. Setting up an insertion burn to solar orbit takes 900m/s of delta-v and 15 minutes with the puny Ion engine.

Having set it on a course to solar orbit, it’s time to leave it alone while I refuel the Odin II and at least bring that crew home. After that we can come back and look at some orbital positioning around the sun.

Debriefing:

An almost unmitigated disaster on nearly all fronts. Tesla II failed in one of its missions, Odin II ran out of fuel and Tesla III is going to need a planetary slingshot to bring the speed down to a point that I’ll have enough delta-v to put it in the position I want.

About the only real success was another successful docking of a fuel shot to rescue the B-Team.

After all of that, I now have 1.617M funds and 829.7 science. We’re much richer from a science point of view after the Mun mission, but we’ve managed to make less than 400k and we still have missions to complete with the satellites.

Not a good run. I need to redesign Odin II and make a cheap satellite to fulfil that contract with the goo canister. I’ve also got to try and figure out a gravity assist.

Definitely not NASA

Today I got up early in the hope of making some more launches for my upcoming post.

While warping through the build times, my Kerbal Alarm Clock notified me that Atlas I was changing its sphere of influence from Kerbin to the Sun. I thought I’d take a look and make sure everything was okay, but when I took control of the craft I just got a black screen with all the dials and switches shown…

After a reboot to try and fix this, Atlas I was nowhere to be found, not even in the save file.

I did have a back up that I got back to the same place and set up a new transfer to Duna. This time I watched it pass through the SOI after I executed the transfer burn to bring Atlas within 150km of the surface of Duna.

After moving the SOI of the Sun, my closest approach was suddenly several million kilometres! I don’t know what happened, or what went wrong but I do know that I need to fix it.

Fixing it, required a retrograde burn of some 600m/s and while we are now a lot lighter on fuel than we should be, we at least have a new encounter – albeit 400 days away, quadrupling the time to Duna. I cannot afford to waste 150k in funds by missing the target planet.

This is NOT NASA! They can hit a comet shaped like a bath toy, I can barely hit a white whale on a black background at 20 paces.

Someone open a Window

We’ve spent a good deal of time exploring the local Kerbin system, so it’s time to get a bit further afield and visit some other planets. We’re going to start with Duna because it’s big and red, much like another planet that some fools in the real world have decided to go take a peak at.

Extra-planetary exploration is tough, especially with the lower technology level we have at the moment. One important thing is nuclear engines as they are hugely efficient and are pretty much the liquid fuel equivalent of ion engines. The TWR is poor, but in space that’s not a big issue.

I’m 100 science short of being able to afford nuclear technology, which is also the last node I can unlock without upgrading the R&D building. Fortunately there is a contract to return science data from around Minmus, and the Athena Survey Probe is still out there. Logging back into the probe, I collect the science form the ScanSat modules. This gives 91 science for the data and 116 science for completing the contract. That’s plenty to get Nuclear technology.

Windows:

Now transfer windows are important. You can’t just light the boosters and head off to Duna willy-nilly. If you do this sort of thing, you’re liable to drift in space for a very long time or end up at the wrong planet. Worse still you might end up on an impact trajectory with Jool – trust me, you don’t have enough delta-v to get out of that one if you leave it too late.

Transferring to the Mun and Minmus, we barely notice that we need a transfer window as one occurs very frequently and the distances really aren’t a problem as it only takes a couple of hours to arrive. Transferring to another planet is a different kettle of fish entirely. The transfer windows don’t come around very often, usually a couple of times a year and the transfer time can be well over a year to get to the outer planets.

The transfer window is the amount of time that you have to perform a burn to do a Hohmann Transfer so that you will enter the sphere of influence of the target body as it orbits around the star. You have to aim for where the target planet will be when you arrive. Depending on how much delta-v you have available you can take a more inefficient, but faster, route, but if time is not an issue then you are generally best advised to make the most efficient burn possible.

Porkchops:

The next thing to do, now we understand what a transfer to another planet involves, is to get the maths out and find out when we need to fire up the engines and for how long. We can do this the hard way, and use the angles between the planets and the manoeuvre nodes to slide things around to get an encounter. I prefer to do this a bit more scientifically, so we’re going to do it like NASA do it, with delicious pig products.

The actual mathematics of this is pretty hideous and involves some differential equations, which I don’t think anyone really enjoys. However, since it’s just a case of doing maths, computers are perfect for the application.

Porkchop plot for Duna Transfer. Launch planner by Alex Moon - http://alexmoon.github.io/ksp/

Porkchop plot for Duna Transfer. Launch planner by Alex Moon – http://alexmoon.github.io/ksp/

So after crunching the numbers you get this coloured plot. The blue areas denote the lowest delta-v usage and so the most efficient transfer while the red areas show the most inefficient transfers. When using MechJeb to perform this calculation it will allow you to set up the manoeuvre node automatically. Otherwise you’ll have to wait until the angles between the planets, relative to the sun, are as they should be and do the manoeuvre node yourself. In the porkchop plot shown the cross-hair shows the most efficient point and this translates into a delta-v requirement of nearly 1600m/s for the transfer and insertion burn.

It’s important to note here that the transfer will take 264 Kerbin days to complete and since these trajectories are very sensitive to initial conditions, going further means you have to be more accurate. Once most of the way to Duna we can perform some trim manoeuvres to fine tune everything.

Duna has an atmosphere that we can use for aero-braking, although we should have enough delta-v to not have to worry too much. When making the trip to Jool, you really need to aero-brake because you’re going far too fast to reasonably slow down with the engines.

Atlas I:

We’re not in a position to send Kerbals out to Duna just yet, mainly because building a multi section space ship really needs the 2.5m docking port. If you try it with 1.5m docking ports things like to flex and generally after “flex” comes “SNAP”. Snap is bad.

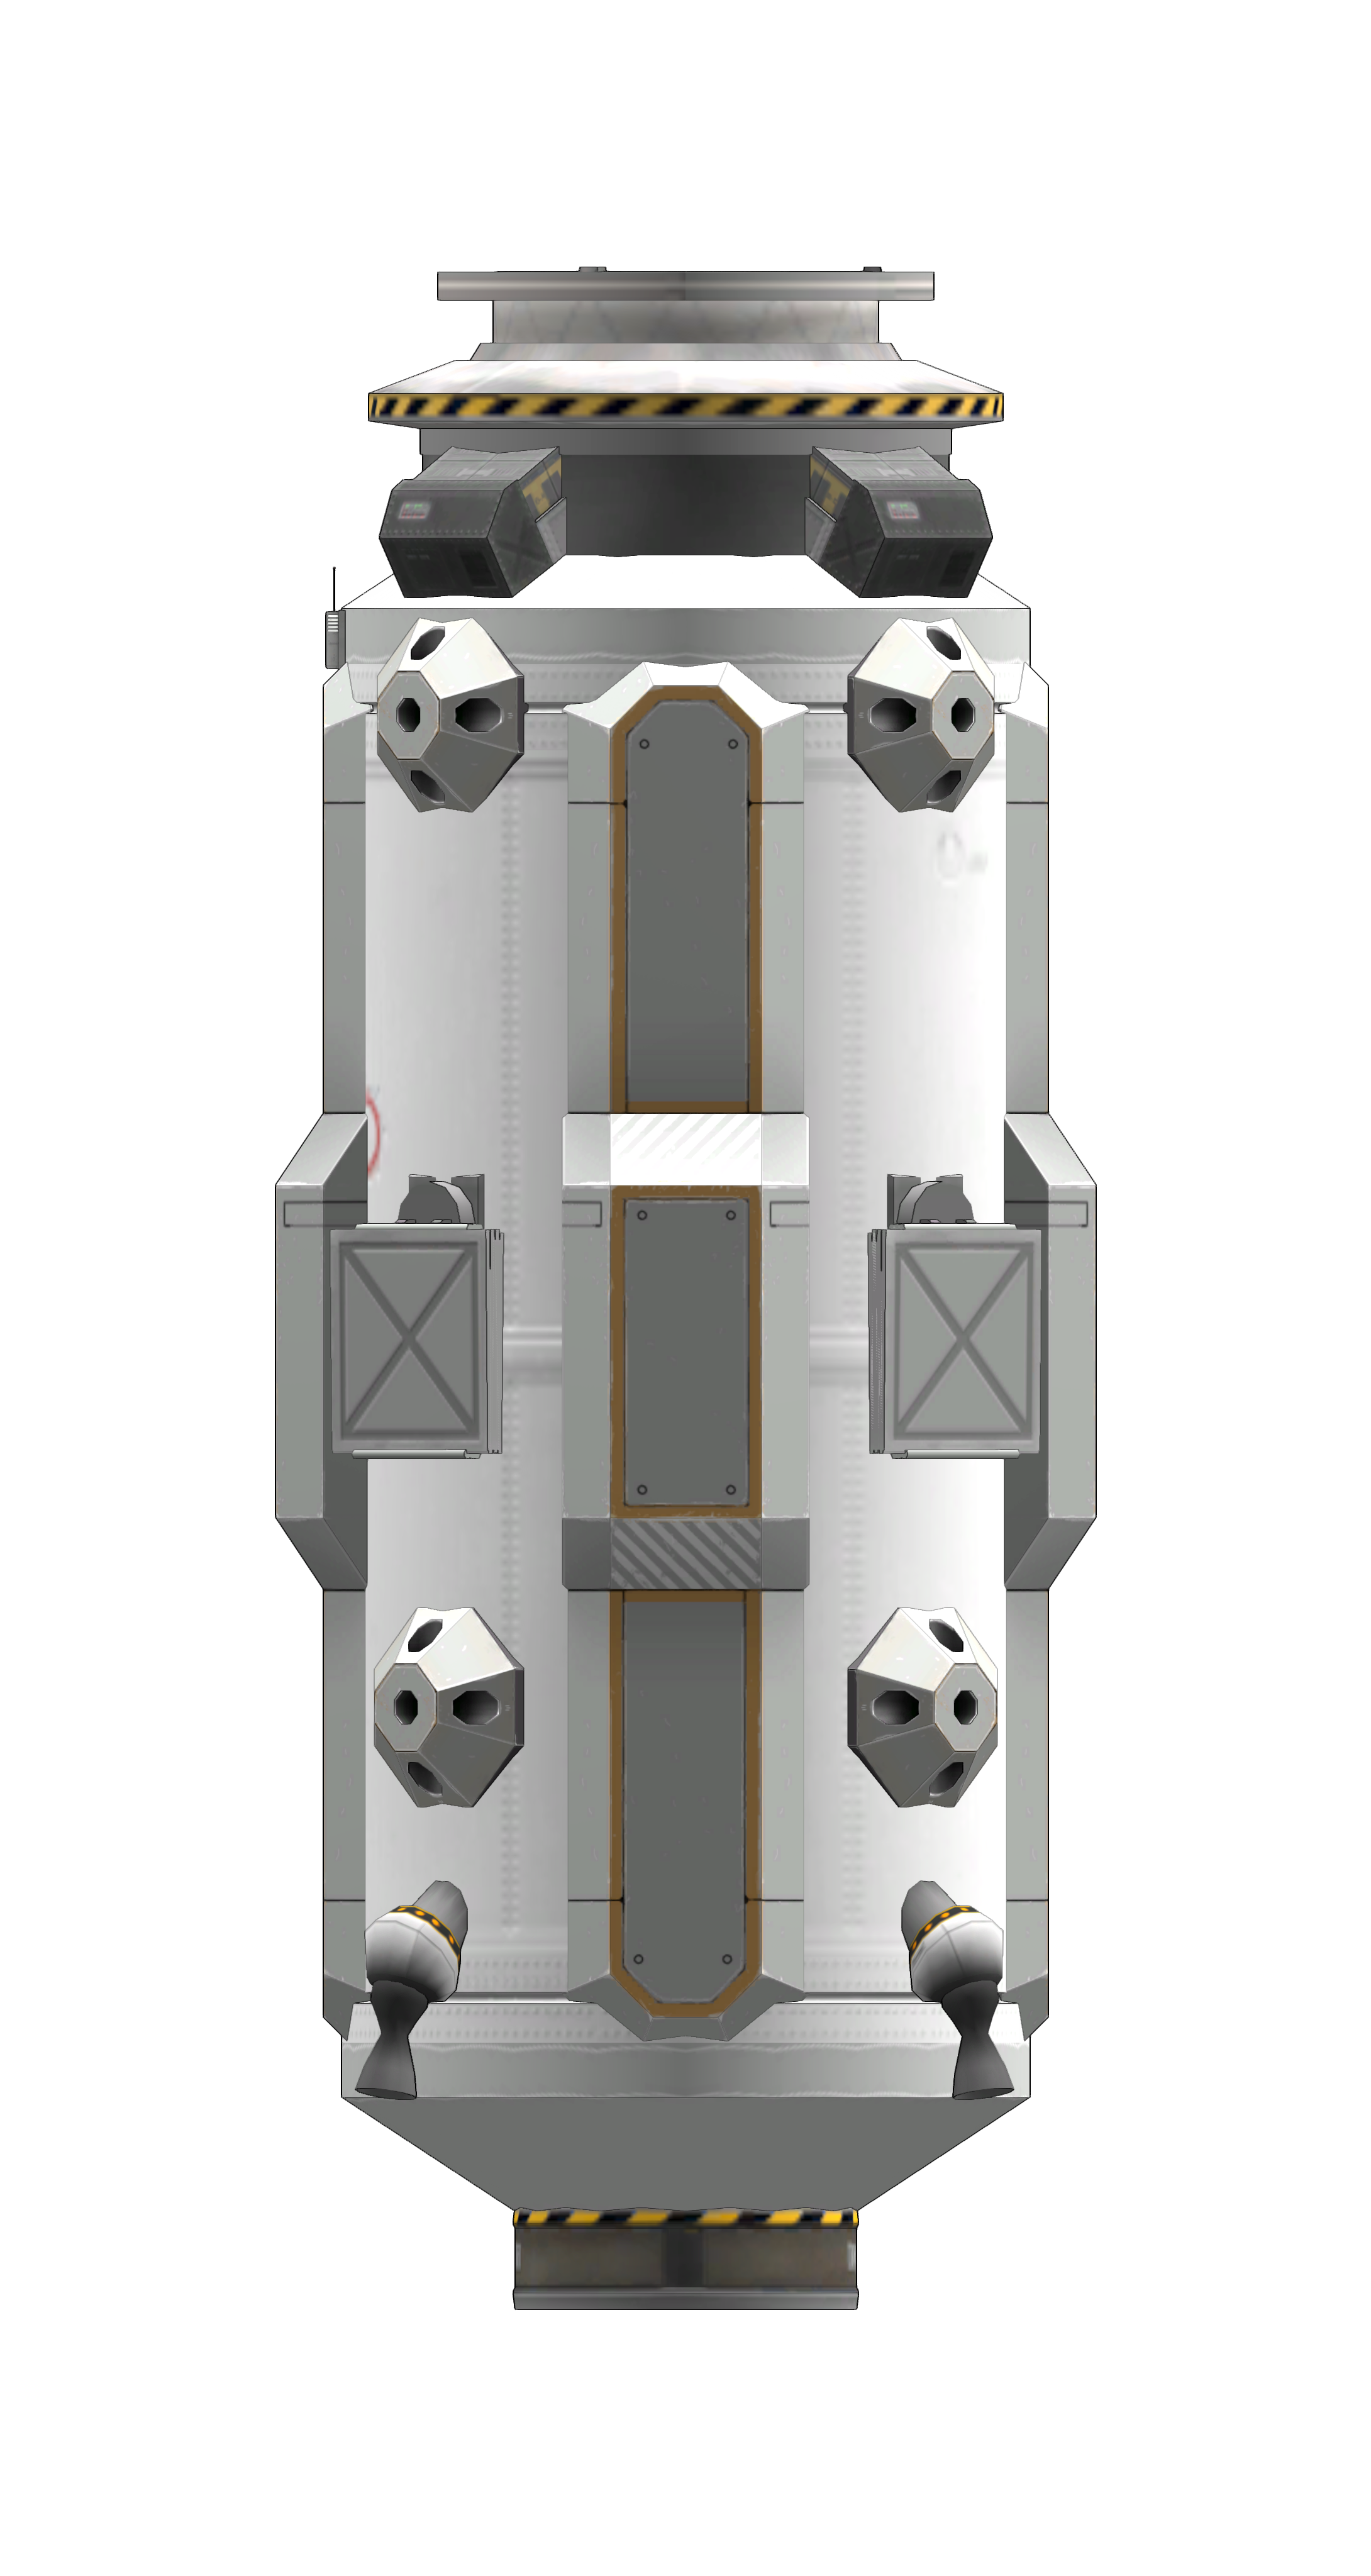
A new generation of multi-function, interplanetary probes are needed. The Atlas I carries a full orbital science package to collect data around Duna before sending one of its mini landers to the surface. This will de-orbit under it’s own power and enter the atmosphere before deploying a parachute to bring it gently down.

The Atlas I will then perform a transfer to Ike, Duna’s only moon. After another run of the scientific experiments from orbit, the second mini lander will decouple and head down to the surface. As there is no atmosphere to speak of on Ike, the probe will have to use its own engines to soft land. In the event that 1000m/s of delta-v is not sufficient to de-orbit and land gently, it will de-orbit and land hard. With no soft, fleshy Kerbals on board it’s no great loss, but it would be nice to get both bodies landed on with one mission.

Atals 1 Front

Atlas 1 side

The nuclear engines provide a total of 6.7km/s of delta-v, which is way more than we’ll probably need, but there’s no harm in being on the safe side for the first interplanetary launch. Is there? The downside is, as always, the weight with Atlas I weighing in at just over 22 tons for launch. Now it’s time for a delivery vehicle.

Atlas 1 Launcher

The whole thing isn’t cheap so I’ve got parachutes on the main booster and the SRBs to try and recover as much of the 155k this thing costs. None of the payload is planned to ever return to Kerbin, so everything attached to that has already been written off – the science it brings will be more than worth it.

Leaving for Duna:

Before setting off I take on the contracts to explore Duna and Ike. These give a pretty nice up front payment and will total over 500k funds when completed and since we’e planned a mission to Duna, we might as well get paid for it.

The launcher is pretty serious and takes Atlas I to an apoapsis of 500km immediately after launch. The orbital stage decouples just before apoapsis and then pushes the Atlas I into it’s final orbit to prepare for the transfer to Duna.

Now it’s just a case of unpacking the payload by removing the fairings and then decoupling the nuclear engines from their mountings. To make things slower and a little safer, this is done in one stage, before a separate staging command blasts off the nuclear engine fairings and makes them ready for use.

Once all the jettisoned stages have drifted away a little, it’s time to open up the three giant solar arrays that the ship will use to charge it’s batteries. This is, once again, likely to be overkill, but better safe than sorry in case something silly happens.

With Atlas I under it’s own power and in a stable orbit, it’s time to let MechJeb calculate the planetary transfer for me:

Porkchop

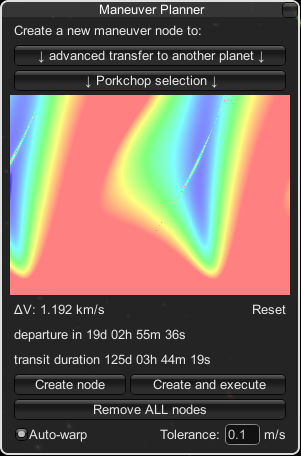
Here I’ve chosen a fairly aggressive burn to reduce the time to the arrival at Duna to the one shown above. Since I’ve got bucket loads of fuel we might as well get there a bit quicker, we also leave in 4 days, rather than in the 19 shown. It’s still 110 days to Duna, but I did have options including taking a year to arrive. MechJeb sets the manoeuvre node up so well that my trajectory will fly straight through the centre of Duna, so I tweak it a little to give a periapsis of about 600km.

During the burn I miss this by a very small margin and end up with a periapsis of over 1,000,000 metres. This nicely illustrates the dependence on initial conditions, with a very small change in my initial velocity, I’ve changed course by 1000km! This isn’t the end of the world though. Moving focus to Duna, I find that a circularisation burn will cost more delta-v than we have remaining. This also ins’t the end of the world…

Half way into the transfer to Duna, I set up another manoeuvre node, this time to bring the periapsis down in a more controlled manner but still done far enough out that to drop the periapsis to 80km only costs a few dozen m/s.

This slideshow requires JavaScript.

Debriefing:

So Atlas I is on the way to Duna, with everything working as planned. The total travel time to a Duna encounter is 110 days and we have an alarm set for 51 days in to perform the trim manoeuvre.

Once we get much closer to Duna I will perform another trim manoeuvre to bring Atlas I in for aero-capture. I wasn’t really planning on this and as a result the ship isn’t exactly designed with atmosphere in mind, hopefully everything will hold together and at least we won’t kill anyone.

What was it Jim Lovell said about problems…

Mistakes

This post started life when I decided to do three fairly simple missions to move things along a bit without too much fuss or ado – hence combining three into one post.

Moa Lift Engine:

They asked for the Moa engine from the Space-Y to be tested splashed down at kerbin for a few funds and 210 science. It’s a simple case of launching, landing in the sea and then disabling the engine, changing the staging and firing it again.

Moa Test Vehicle

After this mission I decide to drop the 40% Fundraising Campaign strategy as I don’t really think it’s paying off. I don’t seem to be getting any of the missions that pay silly money yet and my reputation gains are suffering horribly with the total 90% loss.

I’ve now got 414 science so I pick up the Advanced Aerodynamics technology.

Tesla I:

The Tesla I is the first in a new generation of fully electric ultra long range satellites. These are based around the new ion engines which are powered of Xenon and Electric Charge and give even this initial satellite a delta-v of over 7000m/s. It’s on board experiments are a Plasma Radio Wave Scanner and a Magnetomter. It’s also covered in solar panels to feed the power hungry ion engine.

Tesla 1

Launching into a 160km orbit is done via a very small launch vehicle and once into orbit the Tesla I detaches from the orbital stage of the rocket, unpacks all its solar panels and sets off on the transfer burn to the Mun. The trajectory is slightly different to the usual as I’m less concerned about saving fuel than making sure the solar panels are illuminated when I circularise at the Mun. During the transfer I collect some science form around Kerbin and transmit it back to KSC.

After circularising the orbit around the Mun at 400km I change the inclination to 130 degrees to meet the contract requirements. Then it’s easy to drop the periapsis down close to the surface to increase the eccentricity, although this isn’t enough to complete the contract so I have to increase the apoapsis as well. Then just collect the low and high orbit data and then leave the satellite alone for 180 days.

Even before the contract is completed properly there is still 692 science available to spend so I get the Composites technology

Return to the Mun:

The Odin II is a very small upgrade, more science and changing the landing legs for heavier landing legs. I was a little concerned that the suspension couldn’t quite take the weight of the lander. I’ve also added a shielded docking port to the top since there is no survey probe for this mission. I’m really glad I did.

Odin 2

This is strapped to a slightly smaller launcher than the last Odin launch, but I felt there was more than enough delta-v to go with a little bit less. There are the same two “Thor” solid fuel boosters as for the Odin I, but a slightly smaller main booster fuel tank.

The launch to the Mun is trivial now, and once there I’m aiming for the Northern Basin to satisfy the contract. After getting on the ground it’s the usual procedure to get out, take some surface samples and plant a flag. Returning to the capsule to complete all the on board experiments and the lift off back to a 15km orbit.

Then a realisation…

194m/s of delta-v is not enough to get home.

Fuel Shot:

I’m going to make use of the docking port on the Odin II to attach a small fuel tank powered by RCS engines so that it doesn’t use the liquid fuel it’s supposed to be delivering.

Fuel Shot

Fuel Shot Rocket

It takes 8 days to build the fuel shot and after it’s made it’s rolled straight out to the launch pad. Being a small craft, it’s nice and easy to put it into a 150km orbit of the Mun.

After separating from the orbital stage the fuel shot uses on-board mono-propellent to power its 4 small engines as well as the RCS thrusters for manoeuvring. Since the Odin II doesn’t have any really useful amount of fuel, the fuel shot will do all of its own manoeuvring and actively perform the docking. To make like easier I re-orientated the Odin II and since I started in a much higher orbit it was much easier to get a decent close approach.

Once the fuel shot is docked with Odin II it’s no time at all to transfer the fuel, jetisson the empty fuel pod and plot a course for home. This time I set my return periapsis to 45km, meaning that I actually aerobrake a little at a time rather than just go ploughing into the atmosphere and landing wherever.

Due to the highly inclined orbit, I was never reasonably going to land right back at KSC, but I do manage to land safely, and pretty much at a place of my choosing, in the deserts. At least it’s well away from any mountains!

Debriefing:

Well that couldn’t really have gone much more wrong. In future I will have to be more careful when I want to make a landing at high longitudes. The delta-v required to change the inclination means we can’t land anywhere with Odin II on it’s current launch vehicle, so a redesign is needed. Perhaps I can add an auxilliary monopropellent system for emergencies.

After getting the capsule back to Kerbin, a further 1105.9 Science is available which buys High Altitude Flight, Large Control, and Advanced Metalworks. We’ve also got 1.3M funds in the bank, but we’re in desparate need of upgrading the R&D facility, which costs more than we have. I’m going to need to find some lucrative contracts to get enough for that.

On the plus side, Bob is now level 2, so he should be more useful in future missions. Soon we will have to start training up new Kerbals as I think we’re not far off from preparing a manned mission to Duna or something equally stupid.

Minmus Rising

Over the course of the last few missions I have been collecting contracts that are concerned with Minmus.

For this mission, the plan is to collect science from around Kerbin; collect science around Minmus; land on Minmus; plant a flag on Minmus; collect more data and get home. This should be very lucrative and pave the way with a good dose of extra science to allow us to begin running missions that don’t have an associated contract.

But that’s not all! I’m going to try something that I’ve wanted to do for a long time and that’s to launch an orbital probe along with the lander so we need one launch instead of two.

Athena Survey Probe:

With Karbonite installed, you can go mining for resources on other planets. If the planet doesn’t have an atmosphere, we can extract fuel and easily send it to other ships in orbit so that they can refuel and perform a much longer flight since they will effectively start in space, fully fuelled.

First we need to find the Karbonite though, so I have made the Athena Survey Probe which will scan the terrain altitude, biomes and also scan for Karbonite and other resources. To make all this fit into a convenient package, it’s necessary to use some Infernal Robotics powered hinges connected to some scaffolds. the parts doing the work are a RADAR Altimeter, a Multi-spectral Scanner and an orbital telescope.

Athena Survey Probe

The only downside is that there is only 1300 m/s of delta-v on board so the ability to reposition the satellite is limited, however this is experimental so we can make modifications before we dare to send it off to Duna.

Odin I:

I promised a re-designed lander and here it is. The brand new, still in the shrink wrap, Odin I has state of the art technology including a full collection of all currently available scientific experiments. The larger command pod Mk 2 has room for three Kerbals so we can take a bigger crew and can take advantage of the scientist and engineer specialised kerbals. This, combined with a delta-v of 1800m/s makes it a versatile lander that should see us through the exploration of Minmus and the Mun.

Odin 1 Lander

This Lander has the Athena Probe connected to the front and then this total payload of 13 tons is carried to space by a 2.5m diameter main stage booster supported by two sold fuel rocket boosters.

Odin 1 Launcher

Odin 1 Launcher Exploded

Mission:

The launch is simple with this larger rocket. The 2.5m diameter parts are a lot more stable and this time the separators have solid boosters of their own to push the radial stages away after separation. I circularise the orbit at 140km and use the remaining fuel in the primary stage to change the inclination of the orbit to 6 degrees to match Minmus’.

Then it’s time to jettison the main booster and head for Minmus using the orbital stage, which has more than enough fuel to bring us to a 450km circular orbit. Here is where I jettison the fairings which came off in a very strange way, but at least they didn’t break anything. Next comes the decoupling of the Athena Probe from the front of the command pod and then switching control. Once in control of the Athena I change the inclination to 85 degrees so that it can scan the entire surface.

Once in position, the Athena is unfolded and it begins to use all three of its scanners at once, this will soon build up the full map of the surface of Minmus. Once we have a clear picture of where there are higher concentrations of Karbonite we can start to design and build some off-world infrastructure.

Back to the Odin I and decouple from the orbital stage before descending to the surface. In the time it took to get to the surface form 450km, I’d completely missed the large flat area I was aiming for. Fortunately with a burn to cancel my lateral velocity I was able to hit the next flat area along the equator of Minmus. Once on the ground it’s time for Science! Science and more posing for photographs. The crew complete the experiments and transmit everything back to KSC that retains 100% of it’s scientific value.

On the return to orbit we complete the remaining orbital experiments before plotting a usual return to Kerbin. This time going for an aero-capture manoeuvre with the periapsis at 30km. Folding in the solar arrays the lander re-enters Kerbin’s atmosphere where nothing falls off or explodes and as we slow down it looks like a nice green flat landing area. This is not for long as another small mountain comes into view directly ahead. After deploying both parachutes the capsule floats down onto a very steep slope.

It lands and promptly falls over onto its side, causing it to roll down the side of the hill and splitting in two. Fortunately none of the science containing components are damaged, so it’s not too bad – I just have to go to the tracking station to collect all the landed parts. I really need to work on my re-entry planning, next time I’ll do some aero-braking and try and hit the KSC.

This slideshow requires JavaScript.

Debriefing:

After the huge cost of the parts I used, both in the entry costs for new technology and the science equipment we still only have 1.08M funds. The good news is that we have 1398 science. This is used to buy Advanced Landing, Electronics, Ion Propulsion, Field Science and Unmanned Tech. I think it might be time to have a look at some of those Munar anomalies.

The crew have all leveled up and Bill and Jeb are now level 2, with Bob level 1. Since the Science strategy is turning out to be quite effective in raking in science from all contracts I decide to give a 40% Fundraising Campaign strategy a go along side it. We’ll see how that plays out.

As a bonus I grab an extra 166 science by testing a solid rocket booster landed at the launchpad.

Now to go see if there are any interesting contracts or if next mission we’re going freestyle.

Scientific Harvest

We’ve taken about all the science we can from orbit of the Mun as well as completed a lot of contracts, but we’re still only just starting out on the tech tree. As we progress, the unlocks of new tech requires more and more science as you would expect from any sensible progression so we need to go out and gather more science.

The Mun has the most biomes of any body in the Kerbin system (although biomes were totally overhauled for 0.90 so now other planets have more than two) and even though the multiplier is lower due to it being easy to reach we can certainly get some good science out of landing there. It will also help to build up the experience of the Kerbal crew that we will fire into space as there is a pretty decent amount of XP available for planting a flag, doing an orbit and then getting home in one piece. As long as it’s not one big, flat piece!

Valkyrie III:

This will be the final of the Valkyrie series of manned landers. From the start they have been iterations of a craft bolted together out of necessity with whatever was lying around and I can’t go on like this. Future craft will be purpose built to carry out their tasks.

Valkyrie III Lander

So here is Valkyrie III. It’s basically Valkyrie II with a bunch of extra science strapped to it. Onboard for science collection we have:

Crew reports, EVA, surface samples
Magnetometer (space only)
Goo Canister
Materials bay
Thermometer
Surface Ablation Laser (this might fall off later) (surface only)
Multi-spectral Imaging Platform (space only)
Dynamic Albedo of Neutrons (surface only)

The launch stage is from Valkyrie II as well, but has extra radial boosters in an asparagus/onion setup (it’s all the same for two boosters). This provides a total delta-v of 6659, 8055 m/s. That should get us to the Mun and back and all of the main launch stages should be recoverable, limiting space debris and returning funds.

Valkyrie III Launcher

Valkyrie III Launcher Exploded

This thing has way more delta-v than it needs to get to a 100km orbit, so we take it to 240km before circularising. This will give us a cheaper burn to the Mun, therefore saving us fuel in the orbital stage which is always a good thing.

Once we’ve discarded the primary rocket stage it’s a simple task to set course for the Mun and execute the transfer burn. Then it’s back to dealing with the primary stage but this thing has no control mechanisms, it does have some battery, a few solar panels and a drone core hidden in it. Since we separated the stage when heading pro-grade, an immediate burn will push us further out into space, but we have no way of turning around… Fortunately we don’t need to. As the booster comes around to the other side of Kerbin, since it hasn’t changed its facing, it is now pointing retrograde! At this point just fire the boosters and try to keep it orientated with the engine gimbals and it’s soon on a return trajectory for the parachutes to do their work.

Once the orbital stage of the Valkyrie III has reached the Mun, going around the back of it to improve fuel efficiency, I perform a burn to circularise the craft at around 45km above the surface. This leaves me with a measly 27m/s left to play with. At this point I’m very glad we took the first stage to 240km, any less and we’d be burning the lander’s fuel by now.

Blasting off the fairings results in more explosions as things collide (we really do have to sort that out) but fortunately it’s nothing too serious. After gathering his nerves, Jeb decouples form the orbital manoeuvring stage and takes readings form the magnetometer and multi-spectral scanner before pulling up the biome map of the Mun that was so nicely made by Occulus IV (which is still floating about).

Biome Map

Looking at the map, there are several anomalies to go hunting for but we don’t have the fuel for that today so we pick a landing site in a sensible crater close to the equator to, once again, minimise fuel use. This actually turned out to be one of my better landings and Jeb gets down to the surface with only small amounts of fat-fingering of the controls.

Once he’s there it’s time to do all the science that he can, get out, wander around (making some great use of his selfie-stick) and then get back into the capsule with all the science and transmit what he can to KSC mission control. Thanking him for his data, they order that he must leave his selfie-stick on the Mun as it’s far too annoying to be returned to Kerbin and would likely interfere with re-entry.

The return to Kerbin it text book stuff until re-entry forces hit the craft and under high dynamic pressure the Surface Ablation Laser pings off the side of the capsule in a shower of sparks. Un-fazed by this turn of events all the parachutes are deployed and Jeb catches a brief glimpse of the Surface Laser flying overhead as he falls down to a gentle landing.

This slideshow requires JavaScript.

Debriefing:

After that mission we have finally broken the 1 million funds mark and there is 730.4 science available to spend.

With so much science it’s time to tidy up the tech tree a bit so I get Landing, Aerodynamics, Specialised Control, Supersonic Flight and Actuators. That should keep us going for a bit!

Tune in next time for more liquid fuel based shenanigans.

Go for Burney!

It seems that we have a wayward Kerbonaut. Somehow, and I’m not sure how, Burney has ended up in orbit around Kerbin, with no ship, unlimited life support and only 4 snacks left.

This situation could not be more desperate!

In a hurry, the engineers at KSC bolt together “Rescue 1” and it’s going to take 4 days to put it all together. By the time it’s built Burney will down to his last snack bar and will probably have just the same amount of oxygen. This does assume that he takes it easy on the snacks and doesn’t breathe.

Rescue 1 couldn’t be more basic. A probe core hidden away inside will perform the unmanned flight and rendezvous. This is supporting a crew capsule to put Burney in and resupply him with snacks on the way home, and the rest of the rocket is launch fuel, SRBs, solar arrays and batteries. Oh, and parachutes, don’t forget those.

front_Rescue 1_1

front_Rescue 1_2

So off we go. Burney is floating around at 110km to 100km from Kerbin, so we need to wait until he’s above the KSC and launch. This will put us behind him on the orbit by the time we get there so we need to be at a lower altitude so 90km would be appropriate for an apoapsis.

After launching to a circular orbit of 90km it’s time to catch up with Burney, that just involves waiting.

Once two orbits are complete we’re only 11km from Burney who has still not frozen or suffocated (so well done to him). The way to get a good rendezvous is to now cancel all relative velocity between you and the target which is done by burning retrograde when you are in target mode on the Navball (click on the velocity indicator just above the navball to change modes). If you’re in orbit mode this will go very wrong!

With velocity reduced to zero, you can burn towards the target to move closer. This will give you another point of closest approach, in this case about 3km. Rinse and repeat this method until you arrive at your target. We only get to 160m from Burney but since he’s equipped with the standard RCS spacesuit pack he can float over to the ship.

He grabs a quick EVA report to comment on the beauty of it all now he’s not going to die and hops into the capsule before performing a de-orbit burn and aiming for the next peninsula East of the KSC. He ends up landing in the sea, just of the coast and is eventually recovered having eaten all the emergency snacks on board.

This slideshow requires JavaScript.

Debriefing:

Rescue missions aren’t lucrative, although I offset this by also completing a contract for scientific data around Kerbin. The one thing they do give us is a new Kerbal. So Burney has joined the ranks and it turns out he’s a scientist which will help later to give a bonus to recovered science.

The best thing about rescued Kerbals is they generally have high courage and low stupidity. Low stupidity is a great thing because it affects the efficiency of the MKS and OKS modules. We need this for sustainable off world bases, and dumb Kerbals aren’t much use for that.

The Beginings of Kessler Syndrome

Time to put two more satellites and a little lander up in a fairly short post. We’ve done this sort of thing before and as these missions are no different at their core so I’m not going to go into too much detail of what has gone before.

Occulus III target orbit

Occulus III target orbit

Occulus IV target orbit

Occulus IV target orbit

Occulus III:

The first new satellite carries a Goo Canister and a Magnetometer, there must be a goo canister to complete the contract and the magnetometer balances it out nicely. Other than that it’s propulsion, solar panels and batteries.

front_Occulus III_1

The target orbit is easy to reach so the launch vehicle is very small, but it’s still easy to make orbit with the 1.6 ton payload. The mission rewards are 142k funds and 24 science. It also completes another contract by returning science, generating 30k more funds.

Occulus III on station

Occulus III on station

Occulus IV:

Since this contract didn’t specify any particular science experiments I thought I would use this satellite for two things. Once the contract is completed I can change the orbit and use the ScanSat Multispectral Scanner to fully map the Mun in preparation for surface expeditions.

front_Occulus IV_1

Achieving the contract orbit is not problem, it gives 162k funds and 90 science. Following that I drop the satellite into a 350km circular orbit with an inclination of 85 degrees to map almost the entire surface.

Occulus IV on station

Occulus IV on station

When we come back to this in a few days time it will have scanned out a nice portion of the Mun.

Vanguard II:

Vanguard II has a slightly more interesting mission. It’s going to collect temperature readings on and near the Mun’s surface. This means we’re going to have to change orbits as well as perform at least one landing on the surface and so we’ll need a decent amount of delta-v when we are on station.

Vanguard II Probe 2

This can be achieved in one of two ways, either we build a larger probe with more self contained delta-v, move that into a parking orbit and then send it to the Mun under its own power, or we build a launch stage so large that we can set up an orbit with that and then use the orbital manoeuvring stage to make the transfer to the Mun.

I like big rockets. You should like big rockets too. Here’s a slightly bigger rocket to placate you while I work on something of a more appropriate size.

front_Vanguard II_1

This beast (total Delta-V: 7400, 8732 m/s) will lift the probe well into its orbit before the orbital stage completes circularisation. After that there’s a lot of delta-v left in the orbital manoeuvring stage so that we can go to the Mun, enter orbit and even use what’s left to make some corrections.

Disaster strikes (well not really) when I decouple the fairings. It seems someone used too many explosive bolts and during separation it took one of the mechanised solar arrays with it! This would be bad as ordinarily it would halve our electricity generation capacity, however this time, I covered the probe in flat solar panels. This was mainly to make it look cooler, but it has the added bonus of this not ruining the mission and we can progress, albeit slightly lopsided.

As the missing solar array doesn’t really throw of the centre of mass, SAS can compensate for this and it doesn’t affect the remainder of the mission. After a bit of flying about on the surface and a few repositionings the contract parts are complete. This has been a good mission and we can now leave what’s left of Vanguard II sat on the Mun, in case we ever need to take it’s temperature again. Perhaps if it gets sick.

Debriefing:

After three more missions, things are starting to look a lot more like a space program and less like an afternoon in a junkyard playing with bottle rockets.

We’ve been left with nearly 920k funds and a total of another 509 science to spend. After some completely careless consideration, I’ve gone for Heavier Rocektry, Precision Engineering and Specialised Construction. These should give us the parts we need to make some much longer range probes for exploring the solar system while we send Kerbals to the Mun and Minmus to reap their rewards.

As long as we can dodge all the crap now floating about in space, we should be okay.

One Giant Faceplant for Kerbalkind

The time has come to finally send a living Kerbal to the Mun. With any luck, he’ll still be living by time he gets back to Kerbin.


That’s one small step for a man, one giant leap for mankind.

Neil Armstrong


So, it’s time to build Valkyrie II, with all the latest technology and head out to the Mun. I’ve got three contracts lined up that will net a total of 400k funds if I can pull them all off, if I can do that with one rocket launch it will really help with funding our future Mun missions. So I have to collect scientific data from around the Mun, place a flag on the surface and take some readings above certain locations and then get some surface EVA reports.

Mun Targets

As can be seen from the image, the two locations for orbital observations run in Northerly before making a pretty sharp right turn and descend to get the EVA reports. On the way science can be collected from anywhere in orbit and the flag can be planted at one of the EVA sites along with any other surface science we can strap to the lander.

Valkyrie II:

The first thing we need is a crew capsule and since we’re going to the Mun I want to strap as many experiments to it as possible. With a Goo Canister, Materials Bay, Dynamic Albedo of Neutrons and the crew’s ability to make reports and take surface samples we should get a good haul of science from our first trip to the Munar surface. To back this up we need some batteries and some solar panels, an antenna and an upper and lower landing stage. In order to reduce mass for the return journey the lower stage of the lander also has the landing gear and this will all be left on the Mun. The end result of this feat of duct-tape engineering is not so much pretty as functional:

Valkyrie II Lander

After a lot of thinking about radial boosters and solid fuel, I decided to go for a monolithic rocket with a single core and a massive engine. I say “massive” but these are still only 2.5m diameter parts, but that has more than enough grunt to ping Jeb and his chariot into the sky, packing a total of over 8km/s of delta-v. The total delta-v of the first stage is enough to carry the whole rocket into a parking orbit, as long as my launch trajectory isn’t too terrible. At least this time I can work with Jeb at the controls and he can provide some useful input by holding prograde or retrograde as needed. This isn’t so important for normal manoeuvres but is very handy for landing!

Valkyrie II Rocket

Valkyrie II Exploded View

With a build time of 13 days it’s day 81 before the Valkyrie II is ready and on the pad.

We shall go to space today!

Mission:

With the new, larger launch vehicle getting to orbit is reasonably stress free, although the rocket does like to twist a little in flight due to an intial low TWR and probably a bit of bad design on my part. After reaching a parking orbit of 90km, I turn the whole rocket retrograde before decoupling. A small burn from the orbital stage moves it out of the path of the first stage which is then de-orbited and allowed to return to the surface where its parachutes allow recover for 15k funds.

The transfer to the Mun is textbook and I circularise the orbit at 900km. Unfortunately, after playing with the manoeuvre node I can’t find a way to get to the needed inclination to hit all of the required points for the Mun survey contract. Instead I decide to aim for the large crater on the far side of the Mun that is currently in sunlight. Anywhere flat will do at the moment for a landing site. After de-orbiting I manage to make a complete bollocks of the descent and come down on the ridge between two smaller craters within the East Farside Crater. This leaves the lander at a very precarious angle but SAS can hold it in position. The only good thing is that I collected a crew report on the way down to the surface and transmit it back to mission control to complete one of the contracts.

The next thing to do is grab all the science I can from the surface and plant a flag. Getting out of the command pod, Jeb loses his grip on the ladder, bangs his head on the side of the pod and falls face first into the surface. Kerbal space suits seem to be made of sterner stuff though and Jeb gets up, wipes down his visor and jams a flag into the surface, marking forever his first steps off-world.

I then realise that I haven’t got the ability to take surface samples as I haven’t upgraded the R&D facility. A quick return to KSC fixes that, but not without costing 255k funds! At least now I can unlock tech that requires more than 100 science. The surface sample also gets us 120 science if we return it to Kerbin.

Then I get Jeb back to the command pod after pulling the science out of the Mystery Goo Container and Materials Bay for safe keeping and transmit any data that will return full science. It’s better off sent back in case something goes badly wrong with re-entry – Science in the hand and all that! Sitting in the command pod and looking at the map, Jeb decides that taking off at a heading of 300 degrees will bring the pod over one of the visual survey locations and after some rather erratic manoeuvres the pod is circularised (ish) and heading over the desired location.

A few minutes later Jeb gets the crew report and completes one section of the survey contract. Then it’s time to plan the burn for home. It’s not too hard if you just select one side of the planet and burn prograde, this sets up an escape from the Mun and a bit of radial burning brings the Kerbin Apoapsis down to 35km. This is well inside the atmosphere and will result in aero-capture to save fuel, we certainly don’t have the delta-v to slow down using the engines.

Return is then simple and after entering the atmosphere the pod slows down without anything snapping or falling off under the pressure of belting through the atmosphere at 3.5km/s. All is well until I notice that, once again, I’m headed straight for the side of a mountain. It seems I’m starting to make a habit of this but the parachute slows things down to a rather hard landing at 10m/s. A few things break on landing impact but the science is safe and Jeb walks away.

This slideshow requires JavaScript.

Debrief:

Most of what we set out to do has been accomplished. We got the science data from around the Mun, planted a flag and even managed to get one of the visual surveys done even after the problems of insufficient delta-v. Every time we go to the Mun we can do a little more of that and maybe even get it all now there are only two points to intersect with.

The mission has left us with 353k funds in the bank, 446 science and an upgraded R&D building. The science is spent on three technologies: Space Exploration for more scientific experiment parts; Advanced Exploration for even more experiments and more advances ScanSat scanners that can show biomes and even anomolous signals from the surface and Advanced Electrics to finally get the folding solar panels that make life so much easier in the black.

Jeb also gets 2 experience points which push him nearly to level 2. Stupidly I missed out on some XP by not completing an orbit or the Mun. A stupid mistake to make in my eagerness to get things done, but live and learn.

At least we lived.